Table of Contents
This guide walks you through the process of adding a course in Ghost CMS, covering everything from setting course details to managing access and tags.
01) Add Course Information
Important: Ensure you are creating a Post and not a Page when adding a course.
Start by entering the core information about your course:
- Course Title: The main name of your course.
- Course Description: Provide a clear, concise overview of what the course covers.
- Meta Information: Add any additional meta details necessary for SEO and organization.
Using Ghost Public Preview for Course Description
We recommend enabling the Ghost Public Preview feature when adding your course description. This option allows non-members or visitors to preview the course overview without full access.
Why use Ghost Public Preview?
For premium courses, if you do not enable Public Preview, visitors won’t be able to see the course description unless they are members with access. Enabling this option makes the course more visible and appealing to potential students.
In our setup, we have used the Ghost Public Preview option to ensure the course description is visible.
02) Add Tags
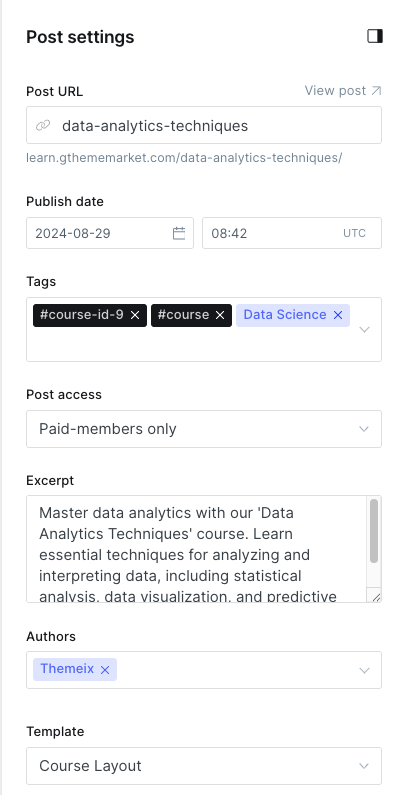
Tags are essential for organizing and internal referencing of lessons and courses.
Required Internal Hashtags
Each course must include exactly two internal hashtags:

#course-id-X— whereXis the unique ID number for the course (e.g.,#course-id-9)#course— this tag is required for all courses
Example: #course-id-9 #course
Adding Public Tags and Categories
You can also add public-facing tags or course categories to improve discoverability and grouping.
Example: UI UX Design
Important Tagging Rules
- Always use a consistent format for course ID tags. For example:
#course-id-2,#course-id-3,#course-id-4. - Different or inconsistent formats will not work with the system.
- Public tags are allowed but must be placed after the
#coursetag.
03) Course Access Settings
Ghost CMS supports three main types of post access levels to control who can view your course content:
-
Public Access:
Use this setting for free courses or lessons that everyone can view. -
Basic Membership Access:
This restricts access to users who have subscribed to the basic membership tier. It is recommended for some premium courses. -
Premium Membership Access:
This grants access to all premium content for members who subscribe to the highest tier.
Tip: For premium lessons, always assign the correct membership tier to control who can access your content effectively.
We recommend using Basic Membership for selected premium courses and Premium Membership for all-access passes.
04) Add Author Information
Every lesson should clearly specify the author’s name. This helps learners know who created the content and adds credibility.
05) Select Course Template (Layout)
Choose the appropriate Course Layout Template to define how the course content will be presented on your site.
- The template controls the visual structure, including lesson navigation, sidebar elements, and overall styling.
- Make sure to select the template designed for courses to ensure a smooth learning experience.
Summary
- Create a Post, not a Page, to add course content.
- Add course title, description (enable Ghost Public Preview for visibility).
- Include two mandatory internal tags:
#course-id-Xand#course. - Add public tags/categories if desired, placing them after the internal tags.
- Set course access based on membership tiers (Public, Basic, Premium).
- Assign an author name to every lesson.
- Select the appropriate course template for consistent course layout.
Following these steps will help you maintain a consistent and well-organized course catalog on your Ghost CMS site.
If you need any assistance or have questions, feel free to reach out to your site administrator or consult the Ghost documentation.
