Find answers, guides, and tutorials instantly
Press Esc to close or Enter to search
Zora Ghost Theme documentation for fast setup, customization, and expert tips to launch your Ghost site.
Complete documentation guide
Zora Ghost Theme is a clean, minimal, and highly customizable Ghost theme designed for content creators, educators, and publishers. Built with modern web technologies including Tailwind CSS, Alpine.js, and smooth animations, Zora offers a versatile platform for blogs, online courses, magazines, and content hubs. The theme provides extensive customization options through Ghost’s built-in settings, allowing you to create a unique online presence without touching a single line of code.
Note: Zora includes a comprehensive course and lesson system with progress tracking, but it leverages Ghost’s native membership feature to control content access rather than providing full LMS functionality like quizzes or certificates.
With Zora, you can create a stunning, customizable website with extensive layout options, smooth animations, and a professional appearance that adapts to your brand identity through the Ghost admin panel.
Loading content...
Loading content...
Loading content...
Loading content...
Loading content...
Loading content...
Loading content...
Loading content...
Loading content...
Loading content...
Loading content...
Loading content...
Loading content...
The Zora Ghost Theme includes special custom settings that allow you to adjust the appearance and functionality of your site directly from the Ghost Admin Panel.
These options give you full control over colors, hero sections, post layouts, course headers, and additional theme features—without editing any code.
You can find these options inside: Ghost Admin → Settings → Design → Theme Settings
These settings let you align the theme with your brand identity.
Color Combinations
Default: Default
Choose from 8 preset color schemes: Default, Onyx, Rust, Fossil, Mint, Ember, Ice, and Pure.
Tip: Each combination is professionally designed for optimal visual harmony.
Appearance Mode
Default: System
Controls light/dark mode. Options: Light, Dark, System (follows device preference), or User (shows toggle button).
Tip: Use “System” for the best user experience as it respects each visitor’s device preference.
Body Text Color
Default: #585F63
Custom color for main text content.
Tip: Use this to fine-tune text readability or match your brand colors.
Control the prominent area at the top of your homepage.
Style 1
Three layout options:
Hero Headline Default: “Explore stories, build skills, discover new perspectives” Main headline text for the hero section. Tip: Keep it short and impactful (under 15 words recommended).
Define how your posts appear throughout the site.
Featured Post Feed Style
Default: Style 1
Card design for featured posts on the homepage.
Tip: Preview different styles to see which best suits your content type.
Post Feed Layout
Default: Style 7
Default card style for your main post feed.
4 Columns
Grid arrangement options:
true
Toggle to show or hide post summaries on cards.
Tip: Disable for a cleaner, more minimal card design.Organize your homepage content automatically using tags.
Homepage Tags
Default: books,course
Comma-separated tag slugs for categorized sections.
Example: If you enter “podcast,tutorials”, posts with these tags appear in dedicated sections.
Homepage Tags Extended
Default: scale-paths,tutorials,guest-posts
Additional comma-separated tag slugs for a second set of sections.
Tip: Use this for organizing different types of content separately.
Homepage Tags Posts Per Section
Default: 6
Number of posts to show per tag section (2-11 posts).
Tip: 3-4 posts for focused sections, 6-8 for balanced sections.
Disable Top Author Section
Default: false
Toggle to show or hide the authors section on the homepage.
Tip: Disable for single-author sites or a cleaner homepage.
Configure how course and lesson pages appear.
Course Header Style
Default: Image on Right
Options: Image on Right, Image on Left
Tip: “Image on Right” for text-heavy courses, “Image on Left” for visual courses.
Content API Key Default: Pre-configured key Required for the lesson system to fetch and track lesson progress. Tip: Get your API key from Settings > Integrations > Add Integration > Custom Integration.
Customize the footer area of your site.
Footer Newsletter Title Default: “Subscribe to newsletter” Heading text for the newsletter subscription section. Tip: Make it action-oriented like “Get Weekly Updates”.
Footer Newsletter Description Default: “Stay updated with our latest news, articles, and exclusive updates delivered straight to your inbox.” Description text to encourage signups. Tip: Highlight benefits and keep it under 2 sentences.
Footer Note Default: “- All rights reserved” Copyright notice in the footer. Tip: Customize with your brand, e.g., “© 2026 Your Brand - All rights reserved”.
With these customization options, you can:
All of this can be done directly from Ghost Admin without touching any code, making it beginner-friendly yet powerful.
Installing Your Ghost Theme
Follow these simple steps to install your new Ghost theme:
yourwebsite.com/ghost).sinju.zip) in your downloaded package.That’s it! Your Ghost site should now be using the new theme. If you have any issues, double-check that you uploaded the correct ZIP file and that the upload finished successfully.
This guide walks you through the process of adding a course in Ghost CMS, covering everything from setting course details to managing access and tags.
Important: Ensure you are creating a Post and not a Page when adding a course.
Start by entering the core information about your course:
We recommend enabling the Ghost Public Preview feature when adding your course description. This option allows non-members or visitors to preview the course overview without full access.
Why use Ghost Public Preview? For premium courses, if you do not enable Public Preview, visitors won’t be able to see the course description unless they are members with access. Enabling this option makes the course more visible and appealing to potential students.
In our setup, we have used the Ghost Public Preview option to ensure the course description is visible.
Tags are essential for organizing and linking lessons to their parent course.
Each course must include two internal hashtags:
#course — this tag is required for all coursesjavascript-basics, web-design, python-fundamentals)Example: #course javascript-basics
You can also add public-facing tags or course categories to improve discoverability and grouping.
Example: programming, web-development, beginner
#course tag is mandatory for the course to be recognized by the theme.javascript-basics instead of just javascript).#course tag.Ghost CMS supports multiple access levels to control who can view your course content:
Public Access: Use this setting for free courses that everyone can view and access.
Members Only Access: This restricts access to users who have subscribed to any membership tier. Recommended for some premium courses.
Paid Members Only Access: This grants access only to paid subscribers. Recommended for premium, all-access courses.
Tip: For premium courses, always assign the correct membership tier to control who can access your content effectively. We recommend using “Members Only” for selected premium courses and “Paid Members Only” for all-access passes.
Choose how the course featured image is positioned on the course page.
Go to Settings > Design > Theme Settings and find “Course Header Style”:
Tip: Keep consistency across all courses for a professional look.
Every course should clearly specify the author’s name. This helps learners know who created the content and adds credibility.
#course and a unique course tag.Following these steps will help you maintain a consistent and well-organized course catalog on your Ghost CMS site.
The course will automatically display:
If you need any assistance or have questions, feel free to reach out to your site administrator or consult the Ghost documentation.
How to Create a Ghost Content API Key
To use this theme and connect your site to Ghost’s Content API, you need to generate a Content API Key from your Ghost admin panel. This key allows your website or theme to securely fetch content from your Ghost blog.
Follow these steps to create your Content API Key:

Tip: Keep this key safe. You’ll need it to connect your theme or site to your Ghost content.
This guide walks you through the process of adding a lesson in Ghost CMS, covering everything from setting lesson details to managing access and tags.
Important: Ensure you are creating a Post and not a Page when adding a lesson.
Start by entering the core information about your lesson:
We recommend enabling the Ghost Public Preview feature when adding your lesson description. This option allows non-members or visitors to preview the lesson overview without full access.
Why use Ghost Public Preview? For premium lessons, if you do not enable Public Preview, visitors won’t be able to see the lesson description unless they are members with access. Enabling this option makes the lesson more visible and appealing to potential students.
In our setup, we have used the Ghost Public Preview option to ensure the lesson description is visible.
Tags are essential for organizing and linking lessons to their parent course.
Each lesson must include two internal hashtags:
#lesson — this tag is required for all lessonsjavascript-basics)Example: #lesson javascript-basics
You can also add public-facing tags or lesson categories to improve discoverability and grouping.
Example: variables, beginner, programming
#lesson tag is mandatory for the lesson to be recognized by the theme.Hide Featured Image:
Add the internal tag #hide-feature-image if you don’t want the featured image to display in the lesson content area. The image will still appear in cards and listings.
Ghost CMS supports multiple access levels to control who can view your lesson content:
Public Access: Use this setting for free lessons that everyone can view and access.
Members Only Access: This restricts access to users who have subscribed to any membership tier. Recommended for some premium lessons.
Paid Members Only Access: This grants access only to paid subscribers. Recommended for premium, all-access lessons.
Tip: For premium lessons, always assign the correct membership tier to control who can access your content effectively. We recommend using “Members Only” for selected premium lessons and “Paid Members Only” for all-access passes. Important: Set the lesson access level to match the parent course’s access level for consistency.
Lessons appear in the course sidebar based on their publish date. To control the order:
Tip: Plan your lesson order before publishing to ensure a logical learning progression.
Every lesson should clearly specify the author’s name. This helps learners know who created the content and adds credibility.
For optimal lesson structure, organize your content with:
Tip: Keep lessons focused and scannable. Use headings, lists, and images to break up text.
#lesson and the parent course tag.Following these steps will help you maintain a consistent and well-organized lesson catalog on your Ghost CMS site.
The lesson will automatically include:
If you need any assistance or have questions, feel free to reach out to your site administrator or consult the Ghost documentation.
In the Zora Ghost theme, navigation menus are configured directly from the Ghost Admin panel. The theme supports both primary and secondary navigation, with dropdown support for the primary menu.
Home
Courses
  - Web Development
  - Design
  - Marketing
Resources
  - Blog
  - Podcast
About
Contact
To create dropdown (nested) menus:
Example:
Resources          (parent)
  Blog            (child)
  Podcast         (child)
  Tools           (child)
The theme automatically creates a dropdown for items with children. Users can hover or click on the parent item to see the dropdown menu.
Ghost also supports a Secondary Navigation option, which you can set up similarly in the admin panel. The secondary navigation is typically displayed in the footer area.
Note: Secondary navigation does not support dropdowns and is meant for links that should be accessible from every page but don’t need primary visibility.
/about, /contact)/about)You can also add external links to your navigation:
https://twitter.com/yourhandle)The Zora theme uses clean, minimal navigation without icons by default. For the best user experience and consistent design, we recommend using text labels only.
Dropdown not appearing?
Navigation not updating?
Mobile menu not working?
The navigation system in Zora is fully configurable through Ghost Admin without any coding required.
In the Zora Ghost theme, you can easily hide the featured image from displaying on the frontend while keeping it for cards, listings, and social media previews. This is useful when you want to display a video or custom header instead of the featured image.
Hide the featured image when:
Navigate to the post or lesson you want to edit in the Ghost Admin panel.
In the Tags section, add the internal hashtag:
#hide-feature-image
This is an internal tag that the Zora theme recognizes to hide the featured image from the content area.
Save your changes and publish the post or lesson.
When you add the #hide-feature-image tag:
This gives you flexibility to:
Video Posts:
#hide-feature-image tag to hide it from the postClean Typography Posts:
#hide-feature-image tag#hide-feature-image tag is internal and will not appear as a public tag on your siteFeatured image still showing?
#hide-feature-imageFeatured image not showing in cards?
#hide-feature-image tag only affects the content area, not cards#hide-feature-imageThe featured image will be hidden from the content area but will still appear in cards, listings, and social media previews. This gives you maximum flexibility in designing your content while maintaining visual consistency across your site.
Ghost CMS provides a Featured Post option that allows you to highlight specific content on your site. In themes that support this functionality (including ours), featured posts are displayed prominently on the frontend.
If you have more than one featured post, they will automatically be displayed on the theme. This is a great way to draw attention to important content, such as announcements, popular articles, or cornerstone content.
To mark a post as featured:
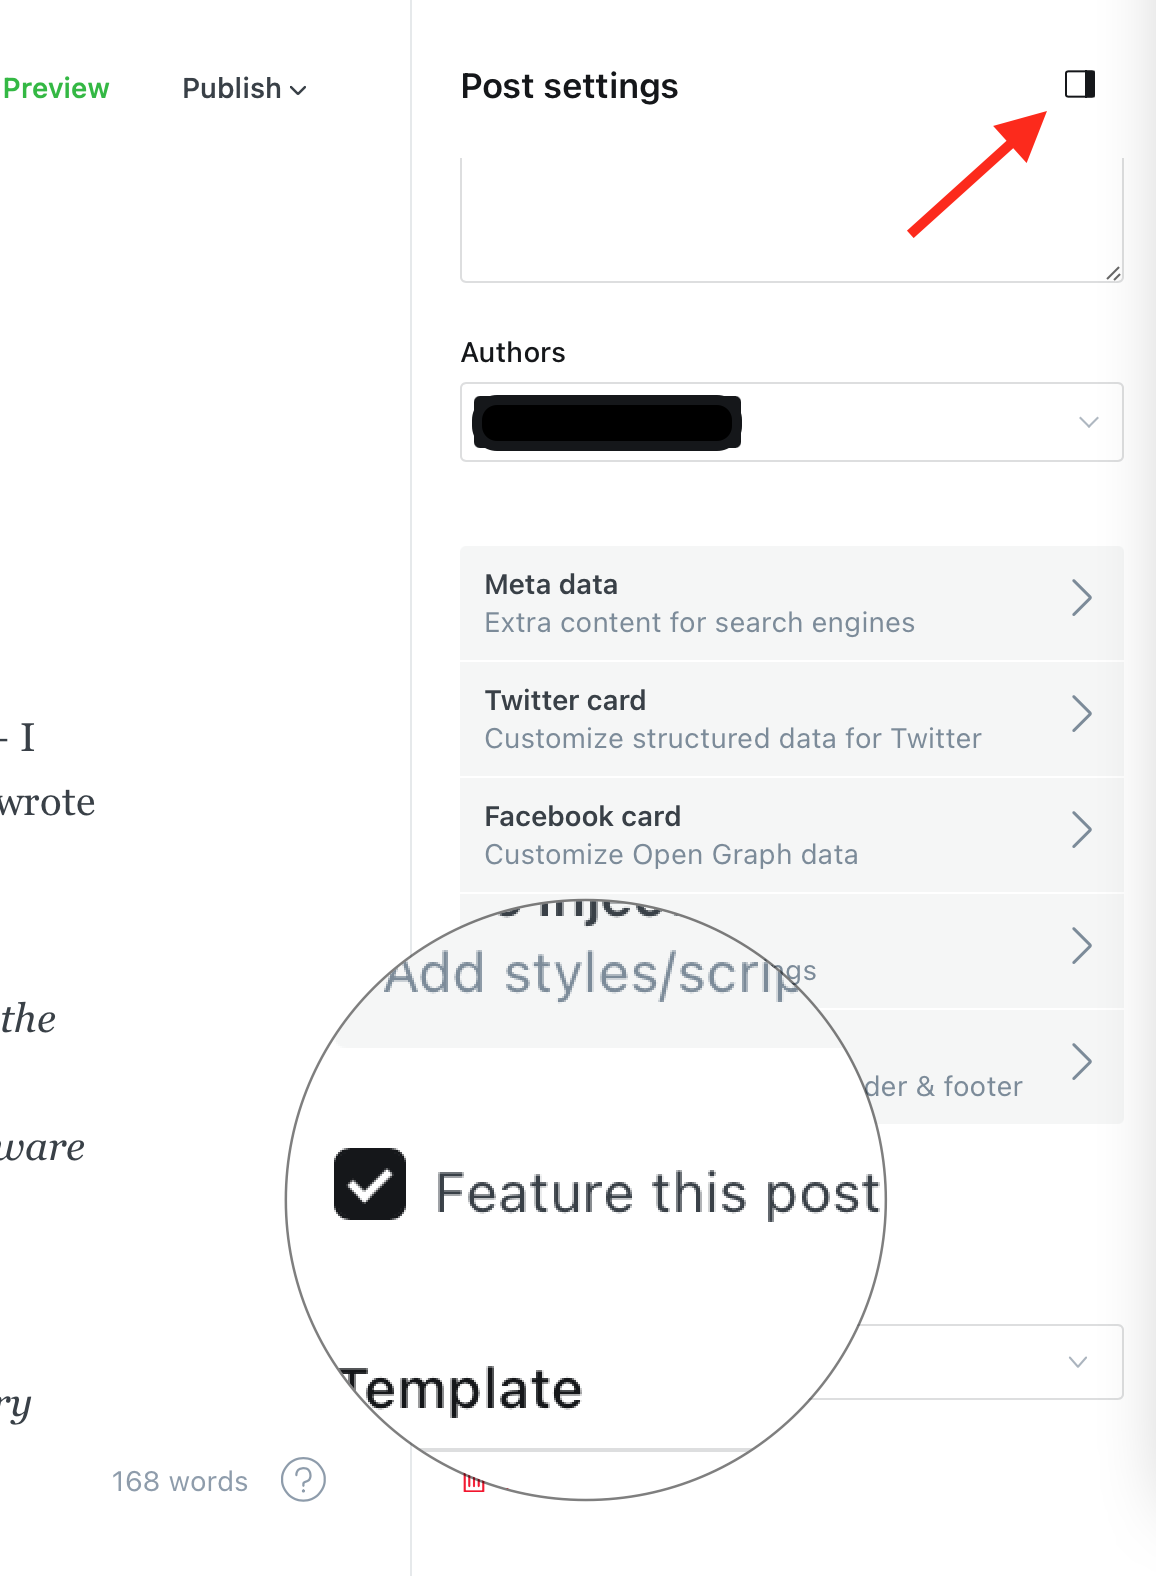
Once a post is marked as featured:
Since featured posts receive the feature class, you can target them specifically in your CSS for custom designs — such as different backgrounds, font styles, or animations.
Using featured posts effectively can help improve engagement and guide your readers to the most important content on your website. Be sure to keep the section updated with fresh or strategic posts to make the most of this feature.
The Zora Ghost theme allows you to easily customize footer links using Ghost’s Code Injection feature. You can add custom links for sections like “Explore” and “Legal” to provide better navigation for your visitors.
Footer links appear at the bottom of every page and typically include:
These links help visitors find important information and improve site navigation.
In the Site Footer section (bottom of the page), add the following JavaScript code with your own links:
<script>
window.zoraFooterExploreLinks = {
   title: "Explore",
   links: [
      { text: "About Us", href: "/about/" },
      { text: "Contact", href: "/contact/" },
      { text: "Blog", href: "/blog/" }
   ]
};

window.zoraFooterLegalLinks = {
   title: "Legal",
   links: [
      { text: "Terms", href: "/terms/" },
      { text: "Privacy", href: "/privacy/" }
   ]
};
</script>
Replace the example links with your own:
For Explore Links:
title to your preferred section nametext to the link label (what users see)href to the actual URL pathFor Legal Links:
title to your preferred section nametext to the link labelhref to the actual URL pathClick Save at the bottom of the page to apply your changes.
<script>
window.zoraFooterExploreLinks = {
   title: "Explore",
   links: [
      { text: "Home", href: "/" },
      { text: "About", href: "/about/" },
      { text: "Contact", href: "/contact/" }
   ]
};

window.zoraFooterLegalLinks = {
   title: "Legal",
   links: [
      { text: "Privacy Policy", href: "/privacy/" },
      { text: "Terms of Service", href: "/terms/" },
      { text: "Cookie Policy", href: "/cookies/" }
   ]
};
</script>
<script>
window.zoraFooterExploreLinks = {
   title: "Explore",
   links: [
      { text: "All Courses", href: "/courses/" },
      { text: "Free Resources", href: "/resources/" },
      { text: "Our Blog", href: "/blog/" },
      { text: "About Us", href: "/about/" }
   ]
};

window.zoraFooterLegalLinks = {
   title: "Legal",
   links: [
      { text: "Terms of Use", href: "/terms/" },
      { text: "Privacy Policy", href: "/privacy/" },
      { text: "Refund Policy", href: "/refund/" }
   ]
};
</script>
<script>
window.zoraFooterExploreLinks = {
   title: "Quick Links",
   links: [
      { text: "About", href: "/about/" },
      { text: "Contact", href: "/contact/" }
   ]
};

window.zoraFooterLegalLinks = {
   title: "",
   links: [
      { text: "Privacy", href: "/privacy/" },
      { text: "Terms", href: "/terms/" }
   ]
};
</script>
/) for internal linkshttps://example.comlinks arraytitle empty ("") if you don’t want a section titlezoraFooterExploreLinks, zoraFooterLegalLinks) must be exactThe theme supports these two main sections. If you need more sections, you can add similar code with different variable names, but ensure the theme recognizes them.
To remove footer links:
After adding footer links:
Links not appearing in footer?
zoraFooterExploreLinks and zoraFooterLegalLinksLinks showing but not working?
href values are correct/Code not saving?
text and href values with your own linksYour custom footer links will now appear on every page of your site, providing easy navigation to important pages and legal information.
The Zora Ghost theme includes a customizable call-to-action (CTA) section that appears on your homepage. This section is created and managed entirely through the Ghost admin panel, allowing you to add promotional content, special offers, or important announcements.
The CTA section is a prominent box that appears on your homepage and can include:
This section is perfect for:
Add your CTA content using the Ghost editor:
Page Title:
Page Content:
Featured Image (Optional):
Meta Title:
Excerpt (Optional):
In the Tags section, add the internal hashtag:
#section-home-cta
This tag tells the Zora theme to display this page as the homepage CTA section.
Click Publish to make your CTA section live.
Page Title: “Get Weekly Tips” Meta Title: “Free” Featured Image: Upload an email icon Content:
Subscribe to our newsletter and receive the latest tips, tutorials, and resources directly in your inbox every week.

[Subscribe Now →](/subscribe/)
Tags: #section-home-cta
Page Title: “Master Web Development in 30 Days” Meta Title: “New Course” Featured Image: Upload a code icon Content:
Our comprehensive web development course is now available! Learn HTML, CSS, JavaScript, and more with hands-on projects and expert guidance.

[Enroll Now →](/course/web-development-101)]
[Limited Seats Available]
Tags: #section-home-cta
Page Title: “50% Off All Courses - This Week Only” Meta Title: “Limited Time” Featured Image: Upload a discount icon Content:
Don't miss our biggest sale of the year! Get 50% off on all premium courses and start your learning journey today.

[Shop Now →](/courses/)
[View All Courses]
Tags: #section-home-cta
Page Title: “Join 10,000+ Learners Worldwide” Meta Title: “Community” Featured Image: Upload a community icon Content:
Connect with fellow learners, share your progress, and get help from experts in our supportive community.

[Join Free →](/community/)
Tags: #section-home-cta
The badge appears as a small, rounded label above your headline. To customize:
Popular badge texts: New, Limited, Free, Popular, Exclusive, Special, Hot
To add an icon next to your headline:
Icon tips:
Use Ghost’s editor to add any content:
Buttons:
Text:
Other Elements:
#section-home-cta tag will be displayedThe CTA section appears in the homepage layout, typically after the hero section and before or after featured posts, depending on your theme configuration.
To remove the CTA section from your homepage:
#section-home-cta tag#section-home-cta tag (keeps page, hides CTA)CTA section not appearing on homepage?
#section-home-ctaBadge not showing?
Icon not appearing?
Content not displaying correctly?
#section-home-ctaThe CTA section will automatically appear on your homepage, fully customizable through the Ghost editor with no coding required.
Ghost CMS allows you to create custom pages using templates, including one that can automatically display all your tags. This is useful for organizing your content and helping visitors explore topics on your site.
Follow the steps below to create a dedicated Tags page:
After assigning the tags page:
tags.hbs template is defined in your theme.By using this method, you can easily create a dynamic Tags page that updates automatically as you add new tags to your content.
In the Zora Ghost theme, certain pages like the courses listing and archive page are generated from routes defined in routes.yaml. To customize the meta tags (title, description, etc.) for these pages, you need to create a corresponding page that overrides the default metadata.
Route pages are pages that are automatically generated by Ghost based on route configurations. In Zora, these include:
/courses/) - Lists all courses/archive/) - Shows all posts organized by dateThese pages don’t have a traditional page in Ghost admin by default, which means their meta tags use default values.
Customizing meta tags is important for:
To customize meta tags for route pages, you create a regular Ghost page with the same URL slug. Ghost will then use that page’s title, excerpt, and metadata for the route page.
The courses page appears at /courses/ and lists all posts tagged with #course.
Step 1: Create a New Page
Step 2: Add Page Content
You can leave the content empty or add a brief introduction. The main purpose is to provide metadata.
Step 3: Set the URL Slug
In Page Settings (right sidebar):
courses/courses/Step 4: Add Meta Title
In Page Settings, find the SEO section:
| Example: “Browse All Courses | [Your Brand] - Online Learning Platform” |
Step 5: Add Meta Description
In the SEO section:
Step 6: Add Featured Image (Optional)
In Page Settings:
Step 7: Publish the Page
Click Publish. Now when visitors go to /courses/, they will see:
The archive page appears at /archive/ and shows all posts organized by date.
Step 1: Create a New Page
Step 2: Set URL Slug
In Page Settings:
archiveStep 3: Add Meta Title and Description
In the SEO section:
Meta Title:
| Example: “Blog Archive | [Your Brand] - All Posts by Date” |
Meta Description:
Step 4: Add Featured Image (Optional)
Upload a featured image for social sharing.
Step 5: Publish
Click Publish. The archive page at /archive/ will now use your custom metadata.
Page Title: “All Courses - [Your Brand]”
| Meta Title: “Online Courses | [Your Brand] - Learn Web Development & Design” |
Meta Description: “Discover expert-led online courses in web development, UX design, digital marketing, and more. Start learning today with practical, project-based courses.”
Featured Image: Upload a course-related image (1200x630px recommended)
URL Slug: courses
Page Title: “Blog Archive”
| Meta Title: “Blog Archive | [Your Brand] - Articles & Tutorials” |
Meta Description: “Browse our complete collection of blog posts, tutorials, and guides. Find the latest insights on web development, design, and technology.”
Featured Image: Upload a blog-related image (1200x630px recommended)
URL Slug: archive
courses, archive)When you create these override pages, the following is customized:
What Doesn’t Change:
After creating your override pages:
/courses/)Meta tags not updating?
Featured image not showing?
Page content showing instead of route content?
Multiple pages with same URL slug?
To revert to default meta tags:
The route page will then use default meta tags again.
To customize meta tags for route-based pages:
courses, archive )The route page will now use your custom metadata for SEO and social sharing, while still displaying the actual courses, archive. All customization is done through the Ghost admin with no coding required.
Creating a functional and visually appealing Contact page in Ghost is simple. Follow the steps below to get started:
To make your Contact page functional, you can integrate a form. Below are three recommended tools to easily add a contact form to your Ghost site:
Google Forms and Jotform can be embedded directly into your Ghost page using an <iframe>.
<iframe
  src="YOUR_FORM_URL_HERE"
  width="100%"
  height="500"
  frameborder="0"
  marginheight="0"
  marginwidth="0"
  >Loading…</iframe
>
To use Formspree, paste the following form code into your page’s HTML section:
<form
  class="themeix-contact-form"
  action="https://formspree.io/your@email.com"
  method="POST"
>
  <input type="text" name="your-name" placeholder="Your Name" required />
  <input type="email" name="_replyto" placeholder="Email" required />
  <textarea name="message" placeholder="Message" required></textarea>
  <button type="submit" class="themeix-contact-btn">Send Message</button>
</form>
Replace
your@email.comwith your actual email address registered with Formspree.
<form
  class="themeix-contact-form"
  action="https://submit-form.com/your-form-id"
>
  <input
    type="hidden"
    name="_redirect"
    value="https://your-website.com/thanks"
  />
  <input type="text" name="name" placeholder="Your Name" required />
  <input type="email" name="email" placeholder="Email" required />
  <textarea name="message" placeholder="Message" required></textarea>
  <button type="submit" class="themeix-contact-btn">Send Message</button>
</form>
Replace
your-form-idwith your actual form id.
You can customize the appearance of your form by adding inline styles or editing your theme’s CSS. Here’s a quick example for custom button and element colors:
<style>
  .themeix-contact-form {
    max-width: 600px;
    margin: 2rem auto;
    padding: 2rem;
    background-color: #ffffff;
    border: 1px solid #e5e7eb;
    border-radius: 12px;
    box-shadow: 0 10px 25px rgba(0, 0, 0, 0.05);
    display: flex;
    flex-direction: column;
    gap: 1.2rem;
  }

  .themeix-contact-form input,
  .themeix-contact-form textarea {
    width: 100%;
    padding: 0.8rem 1rem;
    border: 1px solid #d1d5db;
    border-radius: 8px;
    font-size: 1rem;
    transition: border-color 0.3s, box-shadow 0.3s;
  }

  .themeix-contact-form input:focus,
  .themeix-contact-form textarea:focus {
    border-color: #6366f1;
    box-shadow: 0 0 0 3px rgba(99, 102, 241, 0.2);
    outline: none;
  }

  .themeix-contact-form textarea {
    min-height: 120px;
    resize: vertical;
  }

  .themeix-contact-btn {
    background-color: #6366f1;
    color: #ffffff;
    border: none;
    padding: 0.9rem 1.4rem;
    font-size: 1rem;
    border-radius: 8px;
    cursor: pointer;
    transition: background-color 0.3s ease;
  }

  .themeix-contact-btn:hover {
    background-color: #4f46e5;
  }
</style>
With these steps, your Ghost site will have a professional Contact page that includes a working form and styling that matches your brand.